Dijkstra Algorithm Explained
개요
이 글은 자동차 내비게이션의 경로탐색 또는 그래프 이론에서 접하는 최단거리 탐색에 대해 설명한다. 출발지와 목적지 사이의 최단거리 경로탐색에 활용되는 알고리즘으로는 다익스트라 알고리즘이 대표적이라 할 수 있다. 다익스트라 알고리즘이 내부적으로 어떤 처리과정을 거쳐 결과를 만들어내는지에 대해 살펴보도록 한다.
다익스트라를 이용한 최단거리 찾기
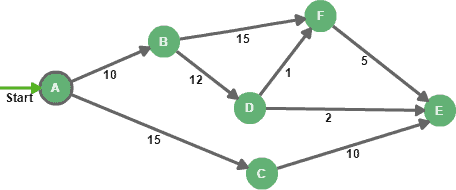
그래프 이론에서 그래프는 링크(edge)와 노드(vertex)로 구성된다. 링크에 가중치(weight)가 적용되는 그래프를 가중치 그래프(weighted graph)라고 하며 이 가중치 그래프 상에서 출발지 노드가 주어졌을 때 다익스트라 알고리즘은 이 출발지 노드와 연결 가능한 모든 목적지 노드들 사이의 최단거리 경로와 거리(가중치의 합)를 구해낸다.
다익스트라 알고리즘의 핵심은 단순하다. 출발지 노드와 연결 가능한 모든 가능한 목적지 노드들 사이에서 상대적으로 긴 경로를 연속해서 제외시켜 나가는 것이다. 이 과정을 이어나가기 위해서는 두 종류의 노드 집합(Settled, Unsettled)을 필요하다.
Settled 노드 집합은 출발지 노드에서부터 최단거리가 확정된 목적지 노드들을 모아놓은 집합이며 Unsettled 노드 집합은 출발지 노드에서부터 방문 가능한 노드들을 모아놓은 집합이다. 따라서 Unsettled 노드 집합의 노드들은 아직 최단거리는 확정되지 않은 상태이다.
그럼 여기서 다익스트라를 이용하여 최단거리를 찾아가는 단계를 아래와 같이 설명할 수 있다.
- 출발지 노드(start node)의 거리는 0으로 설정한다.
- 출발지 노드 이외의 모든 노드들은 거리를 무한대(infinite value)로 설정한다.
- 출발지 노드를 unsettled 노드 집합에 추가한다.
- unsettled 노드집합에 노드가 존재하지 않을 때까지 아래의 과정를 수행한다.
- unsettled 노드집합에서 방문할 노드 하나를 선택하며 이때 선택 기준은 출발지 노드로부터 최단거리의 노드가 선택되도록 한다.
- 방문할 노드로 선택된 노드가 이웃하고 있는 모든 노드들에 대해 출발지 노드부터의 거리를 계산하고 이 거리가 앞서 계산된 거리 보다 짧을 경우 앞서 계산된 값을 대체한다(즉, 최단거리가 되도록 유지)
- 이들 이웃 노드들 중 settled 되지 않은 노드들은 unsettled 노드집합에 추가한다.
이 단계들은 초기화(initialization) 과정과 평가(evaluation) 과정으로 나눌 수 있다. 이제, 그래프에서 이들 단계들이 어떻게 적용되는지 알아보자.
초기화(Initialization)
그래프에서 모든 경로를 탐색해 나가기 전에 출발지 노드를 제외한 모든 노드들의 거리 속성을 무한대(infinite)로 초기화 시킨다. 또한 출발지 노드의 거리는 0이 되도록 설정한다(시작노드이므로 당연히 거리는 0이 됨)
이 과정을 거치면 그래프상의 각 노드는 아래와 같이 이전 노드(predecessor)와 거리(distance)가 초기화 된다.
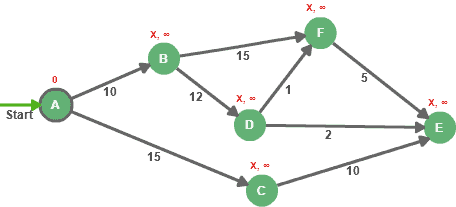
초기화의 마지막 단계로 위 그래프에서 노드 A를 unsettled 노드집합에 추가하며 이후 평가 단계에서 가장 먼저 선택되도록 한다. 이 과정에서 settled 노드집합은 여전히 비어있는 상태로 유지된다.
평가(Evaluation)
이제 그래프가 초기화 되었으므로 unsettled 노드집합에서 거리가 가장 짧은 노드를 선택하고 이 노드와 이웃하고 있는 노드들 중 settled 노드집합에 포함 안된 노드들을 계속 평가해 나간다.
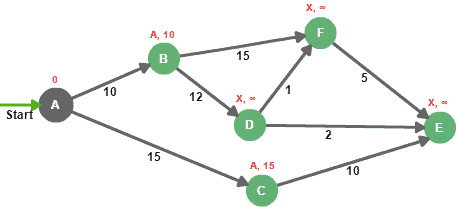
평가 시 목적지 노드까지의 거리 계산은 평가노드의 거리(weight 아님)와 목적지 링크의 weight를 합산한 후 그 값을 목적지 노드의 거리와 비교한다. 즉, 노드 B를 예로들면 0 * 10은 노드 B의 거리인 무한대(infinite) 보다 짧다. 따라서 노드 B까지의 거리는 10으로 대체되며 이전 노드는 A가 된다. 이와 동일한 과정을 노드 C에도 적용한다.
그런 다음 unsettled 노드집합에 있던 노드 A를 settled노드 집합으로 이동시고, 노드 B와 C를 unsettled노드집합에 추가한다. 왜냐하면 이 두 노드는 방문할 수는 있지만 아직 평가가 되지 않았기 때문이다.
두 개(B, C)의 노드가 unsettled노드집합에 추가되었으므로 이들 중 가장 짧은 거리를 갖는 노드(이 경우 노드 B)를 선택한다. 이후 그래프 상에 존재하는 모든 노드들이 settled집합으로 이동될 때까지 이 전체 과정을 계속 반복한다.
평가단계에서 수행하는 모든 반복 과정을 정리하면 아래 표와 같다.
| Iteration | Unsettled | Settled | EvaluationNode | A | B | C | D | E | F |
|---|---|---|---|---|---|---|---|---|---|
| 1 | A | – | A | 0 | A-10 | A-15 | X-∞ | X-∞ | X-∞ |
| 2 | B, C | A | B | 0 | A-10 | A-15 | B-22 | X-∞ | B-25 |
| 3 | C, F, D | A, B | C | 0 | A-10 | A-15 | B-22 | C-25 | B-25 |
| 4 | D, E, F | A, B, C | D | 0 | A-10 | A-15 | B-22 | D-24 | D-23 |
| 5 | E, F | A, B, C, D | F | 0 | A-10 | A-15 | B-22 | D-24 | D-23 |
| 6 | E | A, B, C, D, F | E | 0 | A-10 | A-15 | B-22 | D-24 | D-23 |
| Final | – | ALL | NONE | 0 | A-10 | A-15 | B-22 | D-24 | D-23 |
위 표에서 예를 들어 B-22 표현은 노드 B가 이전 노드이며 출발지 노드인 노드 A로부터의 거리는 22임을 나타낸다.
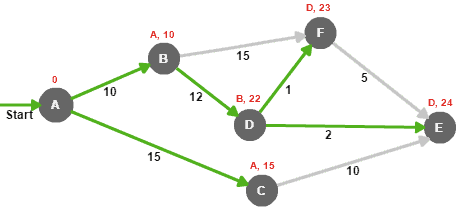
마지막으로, 노드 A로부터의 최단거리 경로는 아래와 같이 계산할 수 있다.
- Node B : A –> B (total distance = 10)
- Node C : A –> C (total distance = 15)
- Node D : A –> B –> D (total distance = 22)
- Node E : A –> B –> D –> E (total distance = 24)
- Node F : A –> B –> D –> F (total distance = 23)
알고리즘 구현
앞에서 설명한 다익스트라 알고리즘의 각 단계들을 컴퓨터 언어(Java Language)로 구현해 보자. 시작하기에 앞서 데이터 모델에 해당하는 그래프를 먼저 만들어야 한다. 그래프는 노드와 노드들 사이를 연결하는 링크로 구성로 된다. 노드와 링크만으로도 최단경로 찾기 알고리즘을 구현할 수 있지만 여기서는 좀 더 현실적으로 접근하기 위해 연결(Connection)이라는 추상적인 개념을 같이 구현한다. Connection은 링크와 링크를 연결한 개념으로 내비게이션에서 좌/우회전, xx미터 앞 좌/우회전 같이 길안내를 할 때 필요로 하는 정보들을 관리한다.
노드(Node)
노드는 그래프 상의 정점(Vertex)를 나타내며 현실 세계의 회단보도, 교차로 등 도로가 논리적으로 끊어지는 지점을 노드로 생각하면 이해가 쉽다. 노드 클래스는 노드관련 정보를 저장하는 Value Object로 활용되며 특이한 점으로는 링크 생성에 활용되도록 하였다.
package app.dijkstra;

import java.util.Collection;
import java.util.HashMap;
import java.util.Map;

/**
 * Represents a Node object in a Graph. This class is used to conceptualize the road network topology in a Graph model.
 * This class is a simplified Node object so that, you can extend this class to apply this in a real world as you need.
 * @author skanto
 */
public class Node {
    private final String name;
    private final Map<Node, Link> links = new HashMap<>();

    /**
     * Constructor. Creates new Node object with a node name. You can change name to a node id and context object
     * as a additional information parameter
     * @param name node name
     */
    public Node(String name) {
        this.name = name;
    }

    /**
     * You can think of the Link as a connection between two links so that linking this Node object with the another
     * Node object returns new Link object.
     * @param to a node to which a Link object is created
     * @param length length information as a demonstration. You can extend length value to a additional
     * context information like the road level, lane count etc.
     * @return newly created Link object
     */
    public Link link(Node to, int length) {
        final Link link = new Link(this, to, length);
        links.put(to, link);
        return link;
    }

    /**
     * Returns Link object associated with this Node object to the specified to Node.
     * @param to The other end of Link object
     * @return Link object that associated with the specified to Node.
     */
    public Link linked(Node to) {
        return links.get(to);
    }

    /**
     * Returns all the Link objects associated with this Node object
     * @return All the Link objects as Collection
     */
    public Collection<Link> links() {
        return this.links.values();
    }

    /**
     * Returns the naem of this Node object
     * @return name of this Node object
     */
    public String name() {
        return name;
    }

    @Override
    public String toString() {
        return name();
    }
}
링크(Link)
노드와 노드를 연결하면 링크가 생성되며 현실 세계에서 도로의 최소 논리 단위로 생각하면 이해가 쉽다. 링크 클래스도 Value Object로 활용되며 노드를 이용하여 링크를 생성했듯이 링크와 링크를 연결하여 Connection을 생성한다는 것이 차이점이다.
package app.dijkstra;

import java.util.HashMap;
import java.util.Map;

/**
 * Represents Link object in a Graph. This class is used to conceptualize the road network topology(edge) in a Graph model.
 * This class is a simplified Link object so that, you can extend this class to apply this in a real world as you need.
 * @author skanto
 */
public class Link {
    private final Node from;
    private final Node to;
    private final int length;
    private final Map<Link, Connection> connections = new HashMap<>();

    /**
     * Create new Link instance using the specified constructor parameters.
     * Notice: The constructor visibility is package scope so you can not instantiate Link object outside this package
     * @param from From side Node object of a Link
     * @param to To side Node object of a Link
     * @param length the length of the Link. You can extend this parameter to accommodate the real world situations
     */
    Link(Node from, Node to, int length) {
        this.from = from;
        this.to = to;
        this.length = length;
    }

    /**
     * Returns From-side Node object of this Link object.
     * @return Node object
     */
    public Node from() {
        return from;
    }

    /**
     * Returns To-side Node object of this Link object.
     * @return Node object
     */
    public Node to() {
        return to;
    }

    /**
     * Returns the length of this Link
     * @return link length
     */
    public int length() {
        return length;
    }

    /**
     * Connects this Link object with the specified link object that eventually creates a Connection instance.
     * @param outward Link object to connect with this Link object
     * @param angle angle value. You can extend this parameter to reflect real world situations.
     * @return Connection object
     */
    public Connection connect(Link outward, short angle) {
        connections.put(outward, new Connection(this, outward, angle));
        return connections.get(outward);
    }

    /**
     * Finds Connection from this Link object which is connected with the specified outward Link object
     * @param outward Link object
     * @return Connection object
     */
    public Connection connected(Link outward) {
        return connections.get(outward);
    }

    @Override
    public String toString() {
        return String.format("[%s-%s: %s]", from(), to(), length());
    }
}
연결(Connection)
Connection은 진입(inward)링크와 진출(outward)링크로 구성되며 링크와 링크가 연결되면 회전 각도와 진입가능, 진출가능 등의 정보를 관리할 수 있다.
package app.dijkstra;

/**
 * This class conceptualize the connection between two Link objects(inward, outward).
 * @author skanto
 */
public class Connection {
    private final Link inward;
    private final Link outward;
    private final short angle;

    /**
     * Creates new Connection instance using the specified parameters.
     * Notice: The constructor visibility is package scope so you can not instantiate Connection object outside
     * this package
     * @param inward Inward Link object from the Connection.
     * @param outward Outward Link object from the Connection.
     * @param angle angle value. You can extend this parameter to reflect real world situations
     */
    Connection(Link inward, Link outward, short angle) {
        this.inward = inward;
        this.outward = outward;
        this.angle = angle;
    }

    /**
     * Returns inward Link object from this Connection
     * @return Link object
     */
    public Link inward() {
        return this.inward;
    }

    /**
     * Returns outward Link object from this Connection
     * @return Link object
     */
    public Link outward() {
        return this.outward;
    }

    /**
     * Returns angle value of this Connection. This angle value is just for demonstration so you can extend this
     * property as a context to hold various information associated with the road connection.
     * @return angle value
     */
    public short getAngle() {
        return this.angle;
    }

    /**
     *
     */
    public String toString() {
        return String.format("{%s->%s: %s}", inward(), outward(), getAngle());
    }
}
가장 최소한으로 경로 탐색에 필요한 그래프 모델이 만들어 졌으므로 이제 다익스트라 알고리즘을 구현한다. 앞에서 이론으로 설명한 내용과 다른 점은 출발지점 노드로부터 최단거리를 각 노드에 저장하지 않고 방문(Visit)이라는 개념을 도입하여 여기에 저장되도록 하였으며 비용(Cost)로 표현했다. Visit객체를 경로탐색 과정에서 활용되는 일련의 정보를 저장하는 Context 객체로 생각해도 좋다. 비용정보를 데이터 모델에 저장할 경우 모델에 종속적이 되어 한 명의 사용자만 실행할 수 있게 된다. 하지만 실제 상황에서는 하나의 데이터 모델을 이용하여 다수의 사용자가 경로탐색을 처리하므로 데이터 모델에 저장하는 것이 아니라 사용자별로(Thread) Context 객체를 따로 유지해야 한다.
방문(Visit)
package app.dijkstra;

import java.util.ArrayList;
import java.util.Collection;
import java.util.LinkedList;
import java.util.List;

/**
 * Encapsulates the context information that needs to maintain when traversing the graph to determine the optimal path.
 * @author skanto
 */
public class Visit {
    private final Node node;
    private Integer cost = Integer.MAX_VALUE; // set the cost to infinite value as a default
    private List<Node> shortcut = new LinkedList<Node>();

    /**
     * Creates new Visit object with the specified Node object
     * @param node Node object
     */
    Visit(Node node) {
        this.node = node;
    }

    /**
     * Returns the Node related to the current Visit
     * @return Node object
     */
    public Node node() {
        return this.node;
    }

    /**
     * Returns the cost of current Visit that accumulated from the source. you can take many aspects of driving
     * scenarios into account as a cost not just link length alone.
     * @return cost value
     */
    public int cost() {
        return this.cost;
    }

    /**
     * Returns the current shortest path accumulated so far from the source
     * @return shortest path as a List object
     */
    public List<Node> shortcut() {
        return this.shortcut;
    }

    /**
     * Updates the shortcut and cost information with the specified shortcut and cost.
     * @param shortcut List object that has Node object as a list
     * @param cost cost to update. Usually the specified cost is lower than the cost of this object
     */
    public void update(List<Node> shortcut, int cost) {
        this.shortcut = shortcut;
        this.cost = cost;
    }

    /**
     * Traces the connection from the source Node to this Visit Node and returns as a Collection object
     * The Collection object has connection information related to the optimal path
     * @return Collection object that contains Connections from the source to this Visit object
     */
    public Collection<Connection> trace() {
        List<Node> visits = new LinkedList<>(shortcut());
        visits.add(node());
        if (visits.size() < 3) throw new IllegalStateException(String.format("Can not make trajectory: %s",  visits));
        List<Connection> connections = new ArrayList<>();
        for (int from = 0, via = from + 1, to = via + 1; to < visits.size(); from++, via++, to++) {
            Link inward = visits.get(from).linked(visits.get(via));
            Link outward = visits.get(via).linked(visits.get(to));
            connections.add(inward.connected(outward));
        }
        return connections;
    }

    @Override
    public String toString() {
        return String.format("%s(%s)", node(), cost());
    }
}
다익스트라(Dijkstra)
이제 최단거리를 찾는 다익스트라 알고리즘을 구현한다. Dijkstra 클래스의 핵심은 경로를 탐색하는 과정으로 traverse 메소드가 이 전체 과정을 구현한다. 이 메소드의 동작 과정을 보면 앞에서 설명한 내용이 이해될 것이다.
package app.dijkstra;

import java.util.Comparator;
import java.util.HashSet;
import java.util.LinkedList;
import java.util.List;
import java.util.Optional;
import java.util.Set;

/**
 * This class implements Dijkstra Algorithm
 * @author skanto
 */
public class Dijkstra {
    /**
     * Finds optimal path that has lowest cost form source to destination
     * @param source Node object that starts from
     * @param destination Node object that gets to
     * @return Visit object that has information for the optimal path.
     * If no visit exists between source and destination returns null
     */
    public static Visit traverse(Node source, Node destination) {
        Set<Visit> settled = new HashSet<>();
        Set<Visit> unsettled = new HashSet<>();

        Visit visit = new Visit(source);
        visit.update(visit.shortcut(), 0);
        unsettled.add(visit);

        while (unsettled.size() != 0) { // terminates when the all links are visited (no more unsettled element)
            /* choose an adjacent visit that has minimum cost */
            visit = unsettled.stream().min(Comparator.comparing(Visit::cost)).get();
            peek(unsettled, settled, visit); // prints snapshot of information
            unsettled.remove(visit);
            for (Link link: visit.node().links()) {
                Optional<Visit> any = unsettled.stream().filter(v -> v.node().equals(link.to())).findAny();
                // if exists reuse it otherwise creates new one
                Visit adjacent = any.isPresent() ? any.get() : new Visit(link.to());
                if (!settled.contains(adjacent)) {
                    adjustShorcut(visit, adjacent, link);
                    unsettled.add(adjacent);
                }
            }
            if (visit.node().equals(destination)) return visit; // the shortest path is found
            settled.add(visit);
        }
        return null;
    }

    /**
     * Switches the cost of adjacent visit with the cost of the current visit if the cost of current visit is lower
     * than the adjacent visit as well as replaces the shortcut of adjacent with the current one.
     * @param current the context of current visit
     * @param adjacent the context of the adjacent Node visit
     * @param link the Link object from the current Visit node to the adjacent visit node
     */
    private static void adjustShorcut(Visit current, Visit adjacent, Link link) {
        if (adjacent.cost() <= current.cost() + link.length()) return; /* no need to calculation */
        List<Node> shortcut = new LinkedList<>(current.shortcut()); // copy the current shortcut
        shortcut.add(current.node());
        adjacent.update(shortcut, current.cost() + link.length()); // updates the shortcut and cost simultaneously
    }

    /**
     * Writes the information about current visit in the middle of Algorithm execution
     * @param unsettled Set containing Visits that has not been explored
     * @param settled Set containing Visits that has determined the lowest cost
     * @param evaluate Visit object the algorithm is now on
     */
    private static void peek(Set<Visit> unsettled, Set<Visit> settled, Visit evaluate) {
        System.out.printf("unsettled: %s\nsettled: %s\nevaluate: %s\nprobe: %s\n\n",
                unsettled, settled, evaluate, evaluate.node().links());
    }
}
알고리즘 테스트(Demo)
이제 그래프 모델과 알고리즘을 구현했으므로 최단거리가 정상적으로 생성되는지 확인을 위해 실제 데이터를 이용하여 데이터 모델을 생성하고 경로찾기를 수행하는 간단한 데모 프로그램을 제작한다.
package app.dijkstra;

/**
 * Demonstrates the working of Dijkstra algorithm
 * @author skanto
 */
public class Demo {
    /**
     *        C -- F
     *       / \  /  \
     *      B -- D -- E -- G
     *     /         /
     * -> A ------- C
     */
    public static void pathfinding() {
        Node A = new Node("A");
        Node B = new Node("B");
        Node C = new Node("C");
        Node D = new Node("D");
        Node E = new Node("E");
        Node F = new Node("F");
        Node G = new Node("G");

        Link AB = A.link(B, 10);
        Link BD = B.link(D, 12);
        Link BF = B.link(F, 15);
        AB.connect(BD, (short) 110);
        AB.connect(BF, (short) 160);

        Link AC = A.link(C, 15);
        Link CE = C.link(E, 10);
        AC.connect(CE, (short) 130);

        Link DE = D.link(E, 2);
        BD.connect(DE, (short) 140);

        Link DF = D.link(F, 1);
        BD.connect(DF, (short) 80);

        Link FE = F.link(E, 5);
        BF.connect(FE, (short) 200);
        DF.connect(FE, (short) 90);

        Link EG = E.link(G, 8);
        FE.connect(EG, (short) 170);
        DE.connect(EG, (short) 180);
        CE.connect(EG, (short) 80);

        Node source = A, destination = G;
        Visit visit = Dijkstra.traverse(source, destination);
        System.out.printf("Shortcut to %s: %s, Cost: %s\n", destination, visit.shortcut(), visit.cost());
        System.out.printf("Route: %s\n", visit.trace());
    }

    /**
     * @param args
     */
    public static void main(String[] args) { pathfinding(); }
}
위 Demo 프로그램을 실행하면 아래와 같이 출발지 노드(A)와 목적지 노드(G)사이에 최단거리가 생성되는 것을 확인할 수 있다. 목적지 노드까지의 최단거리의 노드는 A->B->D->E 이며 Cost는 32가 된다. 이때 경로 연결(Connection)은 {[A-B:]->[B-D]}, {[B-D]->[D-E]}, {[D-E]->[E-G]}]가 됨을 확인할 수 있다.
unsettled: [A(0)]
settled: []
evaluate: A(0)
probe: [[A-C: 15], [A-B: 10]]

unsettled: [C(15), B(10)]
settled: [A(0)]
evaluate: B(10)
probe: [[B-F: 15], [B-D: 12]]

unsettled: [D(22), F(25), C(15)]
settled: [A(0), B(10)]
evaluate: C(15)
probe: [[C-E: 10]]

unsettled: [D(22), F(25), E(25)]
settled: [C(15), A(0), B(10)]
evaluate: D(22)
probe: [[D-F: 1], [D-E: 2]]

unsettled: [F(23), E(24)]
settled: [D(22), C(15), A(0), B(10)]
evaluate: F(23)
probe: [[F-E: 5]]

unsettled: [E(24)]
settled: [D(22), F(23), C(15), A(0), B(10)]
evaluate: E(24)
probe: [[E-G: 8]]

unsettled: [G(32)]
settled: [D(22), F(23), C(15), A(0), B(10), E(24)]
evaluate: G(32)
probe: []

Shortcut to G: [A, B, D, E], Cost: 32
Route: [{[A-B: 10]->[B-D: 12]: 110}, {[B-D: 12]->[D-E: 2]: 140}, {[D-E: 2]->[E-G: 8]: 180}]
마치며…
이 글에서 다익스트라 알고리즘이 어떻게 최단거리를 찾아내는지 알아 보았다. 실제 내비게이션의 경로탐색은 위에서 설명한 기본 기능 외에 다양한 고려사항이 반영되지만 길찾기에서 핵심적으로 적용되는 동작은 동일하다고 보면 된다.